
In today's fast-paced market, the first showing happens online. Whether you're a real estate agent, an Airbnb host, or a homeowner preparing to sell, your property photos are your most powerful marketing tool. They are often the deciding factor between a potential buyer scrolling past your listing or eagerly scheduling a tour. High-quality visuals don't just showcase a property; they sell a lifestyle, helping viewers imagine themselves living in the space.
Getting those scroll-stopping shots doesn't require a massive budget or years of experience. This guide breaks down essential, actionable real estate photography tips designed for everyone from seasoned agents to first-time sellers. We'll move beyond the basics and dive into specific strategies that deliver professional-grade results.
You will learn how to:
- Master lighting and composition to make every room feel bright and spacious.
- Implement strategic staging that highlights key features without clutter.
- Leverage powerful AI tools, like virtual staging, to transform empty rooms into inspiring living spaces.
- Optimize your images for web performance to ensure fast loading times on listing sites.
Ultimately, great photos lead to more showings, faster offers, and a higher selling price. Once you've captured these perfect images, ensuring they load quickly and beautifully online is the final critical step. To ensure your stunning visuals contribute effectively to a quick sale, it's important to understand the role of optimal image and video compression for real estate agents. Let’s dive into the techniques that will get your property noticed and sold.
1. Master Lighting to Make Your Property Shine
Exceptional lighting is the cornerstone of professional real estate photography. It’s not just about making a room bright; it's about shaping how a potential buyer feels about the space. Proper lighting reveals architectural details, highlights high-end finishes, and creates an inviting atmosphere that makes a house feel like a home. Without it, even the most beautiful properties can appear dark, small, and unappealing.
This is why mastering both natural and artificial light is one of the most critical real estate photography tips. The goal is to produce balanced, vibrant images that accurately represent the property while making it look its absolute best.
Why It Matters for Your Listing
Good lighting directly impacts a buyer's emotional response. A bright, airy photo feels welcoming and positive, while a poorly lit one can feel dreary and cramped. For an Airbnb host, a listing with sunny, professional-quality photos can see booking rates increase significantly because it makes the space feel clean and safe. For agents, it means attracting more serious buyers and potentially higher offers.
Practical Lighting Tips
To elevate your photos from simple snapshots to professional marketing assets, follow these steps:
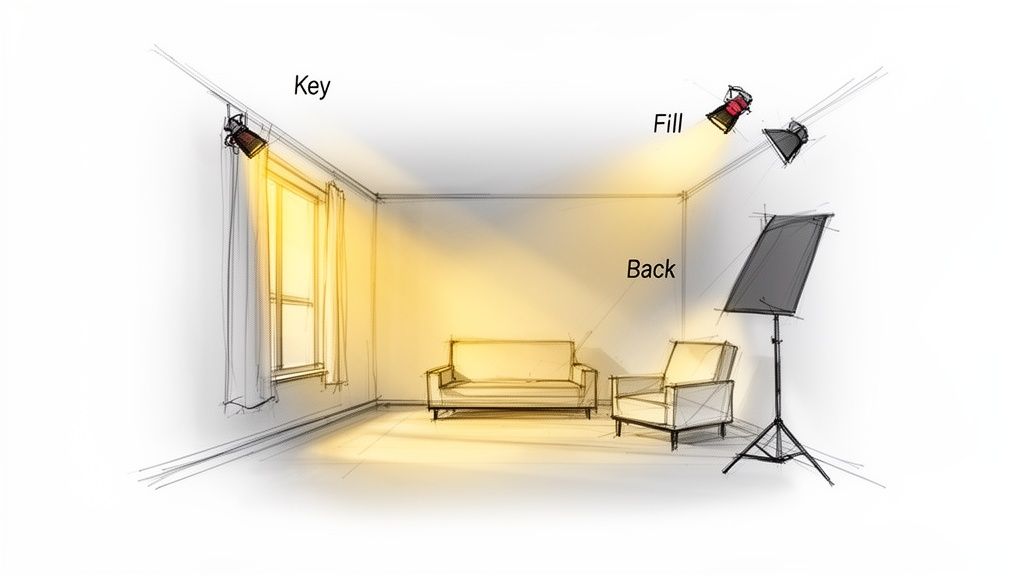
- Embrace the "Golden Hour": Schedule exterior shots for the hour just after sunrise or before sunset. The soft, warm light at this time minimizes harsh shadows and bathes the property in a beautiful, flattering glow that feels premium.
- Use a Reflector: A simple collapsible reflector is an inexpensive tool that can bounce natural light from a window into darker corners of a room. This fills in shadows without the harshness of a direct flash, creating a more natural look. It’s a budget-friendly way to get pro results.
- Bracket Your Exposures (HDR): To capture detail in both the bright windows and the darker interior, take multiple photos of the same scene at different exposure levels (one dark, one medium, one bright). You can merge them later in software to create a single High Dynamic Range (HDR) image that looks balanced.
- Shoot at Twilight: Turn on all interior and exterior lights as the sun sets. This creates a stunning contrast between the warm, inviting interior and the cool, deep blue of the evening sky, adding a touch of luxury to your listing.
2. Use Wide-Angle Lenses to Maximize the Feeling of Space
A wide-angle lens is an indispensable tool in real estate photography because it captures a broader view of a room. This helps make properties appear larger, more open, and more inviting. This technique is especially crucial for smaller spaces like urban apartments, cozy bedrooms, or small bathrooms where maximizing the perception of space can dramatically boost a listing's appeal.
Using lenses in the 16-24mm range allows you to show the layout and flow of a property in a single shot. It gives potential buyers a better understanding of the space before they even step inside, which is one of the most impactful real estate photography tips for building buyer confidence.
Why It Matters for Your Listing
The feeling of space is a huge factor in a buyer's decision. A photo that makes a living room feel expansive is far more compelling than one that makes it feel cramped. For Airbnb hosts, wide-angle shots can increase booking confidence by clearly showing the entire room and its amenities. For real estate agents, these images attract more viewers online and can lead to more in-person showings.
Practical Lens Tips
To harness the power of a wide-angle perspective without common pitfalls like distortion, apply these professional techniques:
- Keep Your Lines Straight: Position your camera on a tripod at about chest height and ensure it is perfectly level. Tilting the camera up or down will cause vertical lines (like walls and door frames) to look like they're falling over, which looks unprofessional.
- Choose the Right Focal Length: A 16-24mm lens is great for small rooms like bathrooms. For larger areas like living rooms, a slightly less wide 24-35mm lens often provides a more natural-looking perspective without making the room look unrealistically stretched.
- Correct Distortion Later: Wide-angle lenses can sometimes make straight lines appear curved (called "barrel distortion"). Use the lens correction feature in editing software like Adobe Lightroom to automatically straighten these lines for a clean, architectural look.
- Set the Stage for AI: When planning to use virtual staging, a well-composed wide-angle shot provides the best foundation. It gives AI tools like an AI Interior Designer a complete view of the room's dimensions, allowing for more accurate and realistic furniture placement when you visualize new ideas.
3. Create Compelling Virtual Tours and 3D Walkthroughs
In today's digital-first market, static photos are just the beginning. Virtual tours and 3D walkthroughs offer an immersive experience that allows potential buyers to explore a property from anywhere in the world, at any time. This technology stitches together images to create a fluid, interactive model of the home, giving viewers control over their journey through each room.
For real estate agents and hosts, this is a game-changer. It elevates a standard listing into a dynamic marketing tool that filters out casual browsers and attracts serious, qualified leads who have already virtually "walked" the space and know they are interested.
Why It Matters for Your Listing
A 3D tour significantly increases engagement and builds buyer confidence. Platforms like Zillow report that listings with 3D tours receive more views and saves. For international or out-of-state buyers, these tours are essential for making a purchasing decision without an in-person visit. This transparency not only attracts more interest but also saves you time by reducing physical showings for people who aren't a good fit.
Practical Virtual Tour Tips
To create a professional and effective virtual tour that captivates buyers, follow these key real estate photography tips:
- Declutter Meticulously: A virtual tour reveals everything. Ensure the property is immaculately clean and staged before you begin shooting, as viewers will be able to look in every direction—including up and down.
- Ensure Consistent Lighting: Move through the property at a time of day when the natural light is consistent. Turn on all lights to ensure a seamless and brightly lit transition between rooms.
- Plan Your Path: Create a logical path through the home, as if you were giving a real tour. Place the camera in spots that allow for detailed exploration of each room.
- Enhance with "Hotspots": Add interactive tags within the tour to highlight specific features, such as the brand of appliances, the type of countertop material, or a link to the user manual.
- Showcase Potential with AI: After capturing the tour, use an AI Interior Designer to create still images showing what an unfurnished space could look like. This allows you to present multiple design styles without physical furniture, a concept also used by the best interior design rendering software to visualize concepts.
4. Stage Simply: Focus on Minimalism and Cleanliness
Strategic staging is about creating a blank canvas, not just tidying up. It involves intentionally removing visual clutter and personal items to highlight a property’s best features—like its layout, size, and natural light. This minimalist approach allows potential buyers to more easily envision themselves and their belongings in the space, fostering a crucial emotional connection.
This is why professional staging is one of the most impactful real estate photography tips. A well-staged property translates into photos that are clean, inviting, and focused on what truly matters: the home itself.
Why It Matters for Your Listing
Staging directly influences a buyer's perception of value and space. Cluttered, personal rooms can make a property feel smaller and less appealing in photos. According to industry reports, staged homes can sell for more and spend 30-50% less time on the market. For Airbnb hosts, a minimalist, hotel-like aesthetic in photos often leads to higher booking rates because it looks clean and relaxing.
Practical Staging Tips
To prepare your property for a photoshoot that captures its full potential, follow these essential steps:
- Declutter Radically: Remove at least half of the personal items, knick-knacks, and excess furniture from every room. This includes family photos, collections, and most countertop appliances in the kitchen and bathroom. The goal is to create "negative space," or empty areas that give the eye a place to rest.
- Neutralize the Palette: Bold, taste-specific wall colors can be distracting in photos. Repaint rooms with neutral colors like light gray, beige, or off-white to create a bright, airy feel that appeals to the widest possible audience. This is a small investment with a big payoff.
- Maximize Flow: Arrange furniture to create clear, walkable pathways. Pull sofas and chairs away from the walls to make the space feel larger and more conversational. Don't block windows or doors.
- Enhance with an AI Interior Designer: After capturing photos of a clean, empty, or minimally staged room, use an AI tool to showcase its versatility. With Interior Redesigne AI, you can instantly generate multiple design concepts, showing a space as a home office, a nursery, or a modern living room without any physical effort. This saves money on physical staging and reduces stress.
5. Use HDR to Balance Bright Windows and Dark Rooms
High Dynamic Range (HDR) photography is a technique for overcoming one of real estate's biggest lighting challenges: capturing detail in both the dark interior and the bright exterior views from windows. By merging multiple photos taken at different brightness levels, HDR creates a single, perfectly exposed image. This prevents "blown-out" white windows and shadowy corners, ensuring potential buyers see everything clearly.
Mastering this is one of the most effective real estate photography tips for producing professional, polished images. The result is a vibrant, realistic photo that makes a property feel bright, spacious, and well-maintained.
Why It Matters for Your Listing
A well-executed HDR photo allows a buyer to appreciate the stunning backyard view and the beautiful hardwood floors in the same shot. This builds trust and provides a more accurate sense of the space. For properties with large windows or scenic views, standard photos often fail, but HDR ensures these key selling features are perfectly showcased, attracting more interest.
Practical HDR Tips
To integrate this powerful technique into your workflow, follow these essential steps:
- Bracket Your Exposures: Set your camera to take a sequence of 3 or 5 shots at different exposures. A common setting is -2 (dark), 0 (normal), and +2 (bright). This captures the full range of light in the scene.
- Use a Sturdy Tripod: This is non-negotiable for HDR. The camera must remain perfectly still across all shots to ensure the final merged image is sharp. Any movement will result in a blurry, unusable photo.
- Aim for a Natural Look: When merging the photos in software, avoid over-processing. A surreal, "glowing" effect looks fake and unprofessional. The goal is realism, not a video game look.
- Be Consistent: Apply a consistent HDR processing style across all photos of the property. This creates a cohesive, high-end feel for the entire listing, making the virtual tour feel seamless and professional.
6. Optimize Camera Settings for Professional Results
Using the right camera equipment and settings is the foundation of professional real estate photography. While modern smartphones are impressive, a DSLR or mirrorless camera with a quality wide-angle lens offers unparalleled control over sharpness and color. Proper settings ensure your images are not just clear but also color-accurate, showcasing a property exactly as it should be seen.
Mastering your camera is one of the most fundamental real estate photography tips. It’s the difference between a simple snapshot and a compelling visual that attracts serious buyers and justifies higher asking prices.
Why It Matters for Your Listing
High-quality, technically proficient images signal professionalism and value. When buyers see crisp, well-composed photos, they associate that quality with the property itself. For agents, a consistent, professional "look" across all listings helps build a trustworthy brand. For an Airbnb host, sharp, vibrant photos can lead to more bookings and command a higher nightly rate.
Practical Camera Tips
To capture images that truly sell a space, focus on these technical details:
- Shoot in RAW Format: Always shoot in RAW instead of JPEG. This captures all the image data, giving you maximum flexibility in editing to adjust brightness, white balance, and color without losing quality.
- Use a Wide-Angle Lens: A lens in the 16-24mm range (on a full-frame camera) is ideal for interiors. It allows you to capture the entire room without distorting the perspective, making spaces feel open and accurate.
- Set the Right Aperture: Use Aperture Priority mode and set your f-stop between f/8 and f/11. This creates a deep depth of field, ensuring everything from the foreground to the background is in sharp focus.
- Use a Tripod: A sturdy tripod is a must-have. It eliminates camera shake, allowing you to use a low ISO (100-400) for clean, noise-free images and to shoot multiple exposures for HDR.
- Master White Balance: Avoid "Auto" white balance. Use a preset (like "Daylight" or "Cloudy") or set a custom white balance to ensure true-to-life colors throughout the entire property, so that white walls actually look white.
7. Capture Detail Shots to Showcase Quality
While wide-angle shots provide a sense of space, it’s the detail shots that convey quality and luxury. Capturing close-ups of architectural features, high-end finishes, and unique hardware allows potential buyers to appreciate the elements that make a property special. These images complement the wider room views and tell a richer story about the home's value.
This focused approach is one of the most impactful real estate photography tips because it helps justify a property's price. By highlighting premium materials and thoughtful design choices, you build a case for the home’s worth, detail by detail.
Why It Matters for Your Listing
Detail shots make a listing feel tangible and high-end. When buyers can see the veining in a marble countertop, the texture of custom tilework, or the precision of crown molding, they connect with the property on a deeper level. For a family home, this could be a close-up of the durable flooring. For a rental, it might be the new, high-end kitchen appliances.
Practical Detail Shot Tips
To effectively document the unique selling points of a property, incorporate these close-up techniques:
- Create a Detail Shot List: Before shooting, walk through the property and identify 5-10 key features that stand out. This could be anything from a cool light fixture, custom cabinet hardware, high-end appliances, or unique flooring.
- Get Close and Focused: Use a lens that allows you to get close. You can use a wide aperture (e.g., f/2.8) to create a shallow depth of field, which blurs the background and makes your specific feature pop.
- Keep Lighting Consistent: Ensure that the lighting for your detail shots matches the overall lighting of the room. This creates a cohesive and professional look throughout the photo gallery.
- Provide Context: After taking a close-up, take a slightly wider shot that shows where that feature is located in the room. This helps buyers mentally place the detail within the larger space, making it more impactful.
8. Perfect Your Exterior and Curb Appeal Photos
The exterior shot is the first impression a property makes. It’s the main image on listings, the thumbnail that entices clicks, and the primary driver of curb appeal. High-quality exterior photos that highlight attractive landscaping and architectural details are non-negotiable for generating serious interest.
Mastering exterior shots is one of the most important real estate photography tips because the goal is to create a compelling invitation, making viewers eager to see what's inside.
Why It Matters for Your Listing
A stunning exterior photo sets a positive tone for the entire listing. For real estate agents, it attracts more viewers and leads to more showings. For an Airbnb host, an inviting exterior shot can be the deciding factor for a guest choosing your property over another, especially if outdoor spaces like a patio or backyard are key features. It communicates that the property is well-maintained.
Practical Exterior Photography Tips
To capture exteriors that stop the scroll, implement these professional techniques:
- Prep the Property: This is crucial. Move cars from the driveway, hide trash cans and garden hoses, mow the lawn, and trim any unruly bushes. A little tidying goes a long way.
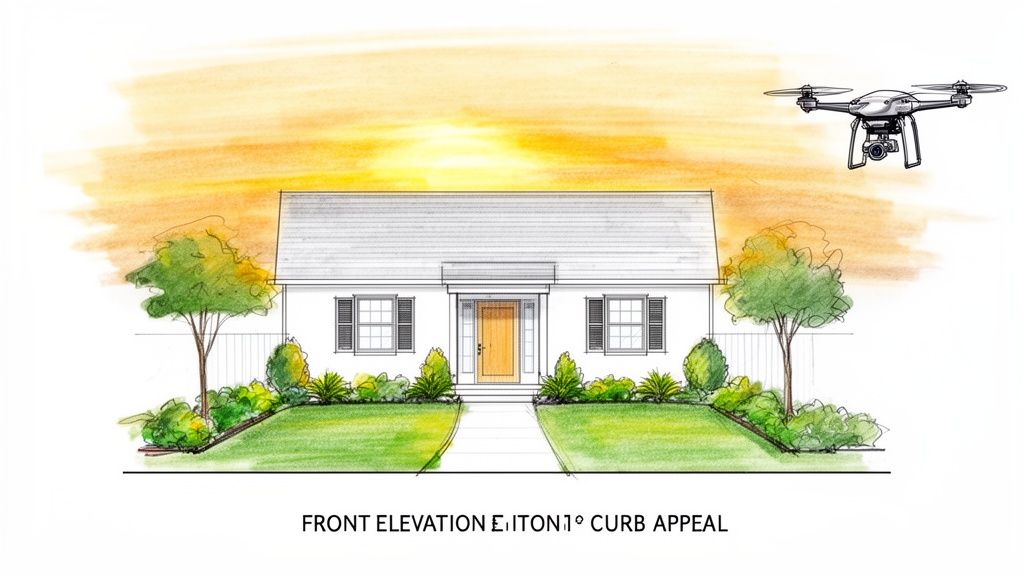
- Shoot During the "Golden Hour": The soft, warm light of the golden hour (just after sunrise or before sunset) is ideal for exteriors. It eliminates harsh midday shadows and bathes the home in a rich, welcoming glow.
- Find the Best Angle: Avoid shooting straight-on. Stand at an angle to the house to show depth and dimension. Position your camera on a tripod at about chest height to get a natural, balanced perspective.
- Use a Drone for Context: For larger properties or homes with great surroundings, a drone shot is invaluable. It can showcase the size of the yard, proximity to a park or lake, and provide a dramatic perspective that ground-level shots cannot capture.
9. Use Consistent Editing for a Professional Look
Shooting a great photo is only half the battle; professional editing is what truly elevates an image. This stage corrects colors, balances brightness, and enhances details to meet professional standards. By developing a consistent editing workflow, you ensure that every image in a listing shares a cohesive, high-quality look.
This consistency builds trust. When potential buyers see a uniform, professional style across all your photos, they perceive the property and your brand as more credible and appealing.
Why It Matters for Your Listing
Inconsistent editing can make a property feel disjointed. A living room that appears warm and golden, followed by a kitchen that looks cool and blue, can be a jarring experience. A standardized workflow ensures every room is presented accurately and attractively. This level of polish signals quality and professionalism, which can directly influence a buyer’s perception of the property's value.
Practical Editing Tips
Use software like Adobe Lightroom to create a streamlined editing process. These real estate photography tips will help you establish an effective workflow:
- Create Your Own Presets: Create a few custom Lightroom presets for different lighting scenarios (e.g., sunny interior, cloudy day, twilight). Applying a preset provides a consistent starting point for every photo, saving you time.
- Correct White Balance First: Before any other adjustments, fix the white balance. This ensures that whites are pure white and all other colors are rendered accurately. This is crucial for showing correct wall colors and finishes. Getting this right is as important as learning how to choose the right paint colors in the first place.
- Make Subtle Adjustments: Avoid over-editing. Start with gentle increases to exposure and contrast. Use a light touch with saturation to make colors pop without looking artificial. The goal is to enhance, not alter reality.
- Sharpen Key Details: Use the clarity or texture slider to sharpen details in features like countertops, flooring, and fixtures. A small increase can make a significant difference without creating a harsh, over-processed look.
10. Use AI for Virtual Staging and Design Ideas
Traditional physical staging is costly, time-consuming, and limits a property to a single look. AI-powered virtual staging platforms change the game entirely. They allow you to take a photo of an empty or outdated room and instantly generate multiple, photorealistic design concepts, showcasing its full potential without moving a single piece of furniture. This is one of the most powerful modern real estate photography tips.
This approach not only saves thousands in staging costs but also helps buyers visualize themselves in the space. An AI Interior Designer empowers you to cater to diverse tastes—showing a room as a minimalist haven, a cozy family space, or a luxurious retreat, all from one photograph. While AI is a fantastic tool for generating ideas, remember its limitations; always combine its suggestions with your own personal taste to create a truly great design.
Why It Matters for Your Listing
An empty room can feel cold and difficult for buyers to imagine furnishing. Outdated decor can be a major turn-off. AI staging solves both problems, saving you time and money. Listings that include virtually staged images see increased engagement because they help buyers overcome these mental hurdles. This translates into more inquiries, faster sales, and often, higher offers, as buyers feel more emotionally connected to a well-presented space.
Practical Virtual Staging Tips
Integrate AI staging into your marketing workflow with these strategies:
- Generate Different Styles: Upload a high-quality photo of a key room and generate 3-5 different designs. Showcase a range of popular styles like Modern, Scandinavian, or "Japandi" (a mix of Japanese and Scandinavian design) to appeal to a wider pool of buyers.
- Create Powerful Before-and-Afters: In your listing gallery, present the original, unfurnished photo next to a professionally staged AI concept. This visual transformation is incredibly compelling and highlights the property's value.
- Visualize Exterior Potential: Don't stop at the interior. To enhance curb appeal, you can use a free AI Landscape Generator to explore potential exterior transformations and present a complete vision for the property.
- Showcase Renovation Possibilities: For properties needing updates, use AI to visualize a renovated kitchen or bathroom. This helps buyers see past the current state and focus on the future potential, justifying the asking price. If you want to dive deeper, learn more about the best virtual staging software for real estate.
Real Estate Photography — 10-Tip Comparison
| Item | Implementation complexity | Resource requirements | Expected outcomes | Ideal use cases | Key advantages |
|---|---|---|---|---|---|
| Master Lighting Techniques to Showcase Property Features | Moderate — requires timing and technique (natural + artificial) | Natural light planning, supplemental lighting, reflectors, possible lighting gear | Balanced, detailed images with accurate mood and fewer post edits | Interior shoots, twilight exterior/interior blends, high-end listings | Improves spatial perception and engagement; better source for AI staging |
| Use Wide-Angle Lenses to Maximize Space Perception | Low–Moderate — positioning and distortion control needed | Wide-angle lenses (14–24mm), tripod, distortion correction tools | Rooms appear larger; more coverage per frame, fewer photos required | Small apartments, compact rooms, standard listing galleries | Maximizes perceived space and efficiency in coverage |
| Create Compelling Virtual Tours and 3D Walkthroughs | High — scanning, stitching, platform learning curve | 360/Matterport cameras, software/subscription, possible pro services | Immersive tours, higher engagement, reduced irrelevant showings | Luxury listings, remote buyers, rentals, high-traffic markets | Provides immersive exploration and differentiates listings |
| Stage Properties Strategically with Minimalism and Cleanliness | Moderate — design choices and physical prep | Staging furniture or pro stagers, cleaning, minor repairs | Faster sales, higher perceived value, broader buyer appeal | For-sale homes, model units, listings needing emotional staging | Cost-effective way to increase appeal without major renovations |
| Implement HDR and Tone Mapping for Balanced Exposures | Moderate — requires bracketing and careful post-processing | Tripod, bracketing-capable camera, HDR software (Lightroom/Aurora) | Balanced highlights and shadows, preserved interior/window detail | Rooms with large windows, high-contrast scenes, skylights | Recovers dynamic range and produces natural, professional images |
| Optimize Camera Settings and Equipment for Professional Results | Moderate–High — technical skill and consistency required | Full-frame camera, quality lenses, tripod, RAW workflow | Higher fidelity, consistent color, better post-processing flexibility | Professional photographers, brand-focused agents, luxury listings | Best image quality, repeatable results, superior color/noise control |
| Capture Detail Shots and Close-ups of Architectural Features | Low–Moderate — selective framing and consistency needed | Macro/short-tele lenses, time for additional captures | Highlights craftsmanship and materials; supports pricing and credibility | Luxury, historic homes, high-end finishes, before/after documentation | Showcases quality and materials for buyer assessment |
| Perfect Exterior and Curb Appeal Photography | Moderate — timing, prep, and possible drone use | Golden-hour scheduling, landscaping prep, drone (if desired) | Strong first impressions, increased clicks and viewings | Single-family homes, properties reliant on curb appeal, developments | Drives listing traffic and communicates neighborhood/context |
| Use Color Correction and Consistent Post-Processing Workflows | Moderate — software skill and workflow discipline | Lightroom/presets, editing hardware, trained editor or SOPs | Cohesive brand aesthetic, time savings via batch processing | Teams, high-volume agents, brand-conscious portfolios | Consistency, efficiency, accurate color for marketing and AI input |
| Leverage AI-Powered Virtual Staging and Design Visualization | Low–Moderate — simple workflows but needs quality source photos | AI staging platform subscription, well-lit framed photos, internet | Multiple design variations quickly, reduced staging costs, faster listings | Vacant homes, sellers avoiding physical staging, rapid marketing updates | Fast, scalable, cost-effective visualization with high engagement |
Your Next Step: From Great Photos to a Done Deal
We’ve covered the essential real estate photography tips, from mastering light and composition to using advanced techniques like HDR and AI virtual staging. The path to compelling listing photos is a mix of careful preparation, technical know-how, and a creative eye. Each of these tips is designed not just to make your photos look better, but to forge an emotional connection with prospective buyers before they ever step through the front door.
A great photograph does more than show a space; it sells a vision. It transforms a collection of rooms into a potential home and a lifestyle. By implementing these strategies, you are moving beyond simple documentation and becoming a visual storyteller for your property.
Key Takeaways for Standout Listings
Let's boil it all down to the most critical takeaways. Mastering these core concepts will give you the biggest return on your effort.
- Light is Everything: Photography is literally "writing with light." Your first priority should always be to maximize natural light by opening blinds and shooting at the right time of day. When needed, use soft, diffused artificial light to create a bright, inviting atmosphere without harsh shadows. This single element has the biggest impact on how appealing a space feels.
- Composition Creates Emotion: How you frame a shot dictates how a viewer feels. Consistently using a tripod to keep lines straight, using wide-angle lenses carefully to show space without distortion, and following basic composition rules will give your photos a professional polish. These rules guide the buyer's eye and make spaces feel balanced and harmonious.
- Consistency is Key: Your editing process is where you unify the entire photoshoot. Strive for a consistent look and feel across all images for a single property. This means uniform white balance, similar brightness levels, and consistent color saturation. A cohesive set of photos tells a more compelling story and builds trust with potential buyers.
From Excellent Photos to Irresistible Potential
Capturing a property accurately and beautifully is the crucial first step. However, the most successful real estate professionals and hosts know that a sale often hinges on helping buyers overcome "imagination gaps." An empty room feels cold and hard to furnish in one's mind. Outdated wallpaper can be a major hurdle, causing buyers to overlook a home's great bones.
This is where the final, game-changing tip comes into play: leveraging AI-powered visualization. Your perfectly lit, well-composed photos show the reality of the space, but tools like an AI Interior Designer show its potential. This is the bridge that connects what a property is to what it could be for a buyer.
You can instantly transform an empty living room into a cozy "Japandi" retreat or a sleek, modern entertainment hub. You can show a family how a spare bedroom could become a perfect nursery or a functional home office. This isn't about deception; it's about inspiration. It’s about reducing the stress of decision-making and making it easier for buyers to envision themselves living happily in the space. By combining stellar photography with AI-driven design possibilities, you create a powerful marketing package that addresses both the logical and emotional sides of a home-buying decision.
Ready to instantly reimagine your room from a photo or sketch? Try Interior Redesigne AI. It’s the perfect tool for virtual staging and exploring new room makeovers, helping you visualize your ideas before you commit, saving you time and money.