
Every great room starts with an idea. Whether you're picturing a cozy bedroom makeover, a functional kitchen for your family, or a stylish living room for your rental property, that spark of imagination needs a bridge to reality. That's where interior design sketches come in. They are the crucial first step in turning a fleeting thought into an actual, workable plan.
And no, you don't need to be an artist. The goal is to get your ideas out of your head and onto paper so you can visualize layouts, solve spatial puzzles, and communicate your vision without spending a dime.
Why a Simple Sketch Is Your Most Powerful Design Tool
A quick drawing is your best defense against expensive design blunders. It’s the fastest and cheapest way to test-drive your ideas before you commit to buying furniture or hiring a contractor. Think of it as a no-risk playground for your creativity, perfect for planning a room in your apartment or a full home renovation.
This simple exercise forces you to answer critical questions early on. Will that gorgeous oversized sofa actually swallow your small living room? Is there enough space to walk around the bed without bumping into the dresser? A sketch helps you solve these problems on paper, not after the delivery truck has left.
For Airbnb hosts and real estate agents, a thoughtful sketch is a secret weapon. It helps you plan a layout that feels open and intuitive, boosting your listing's appeal to potential guests or buyers.
The Real-World Benefits of Sketching
Sketching is really a thinking process. As you draw, you clarify your goals and uncover potential roadblocks you hadn't considered.
The biggest benefits for your space and wallet are:
- Saving Time and Money: Catching a layout issue on paper is free. Realizing your new dining table blocks a doorway after it's been delivered is a costly, frustrating headache.
- Reducing Decision Stress: It’s much easier to choose paint colors and furniture when you see how everything fits together in a sketch. It makes the whole room makeover process feel more intentional and less overwhelming.
- Improving Communication: A sketch is a universal language. It’s the clearest way to show your vision to a partner or contractor, making sure everyone is on the same page from the start and avoiding expensive misunderstandings.
Whether you're mapping out a gallery wall in your apartment or planning a complete kitchen renovation, the power of a sketch is its ability to bring clarity. It’s the foundation every successful room is built on.
Need some inspiration for what to sketch? Our comprehensive interior design styles guide is a great place to find an aesthetic you love.
By translating your ideas into a visual format, you’re not just drawing a room—you’re building a blueprint for a space you’ll love. It's the most effective way to ensure the final result matches the vision in your head.
Picking the Right Sketching Tools for Your Project
Before any great design comes to life, it starts as a simple idea. Getting that idea out of your head and onto a page requires the right tools. But don't worry—you don't need an expensive art supply haul to create a powerful interior design sketch. The most important thing is finding a method that feels easy and lets you work without getting in your way.
So, where do you start? Your choice boils down to two main paths: the classic pen-and-paper route or a modern digital approach.
The Classic Pen and Paper Approach
There's something incredibly satisfying about putting a real pencil to paper. It's direct, tactile, and free from distractions like low-battery warnings. This method is brilliant for its simplicity and the fact that you can do it anywhere. It's perfect for a homeowner quickly trying out new furniture arrangements.
If you're going old-school, here’s a simple kit that works wonders:
- Graph Paper: This is your best friend when you're starting out. The grid gives you an instant framework for straight lines and helps you keep everything in proportion without much effort.
- A Mechanical Pencil: A 0.7mm mechanical pencil is great for initial drafts. It gives you a clean, consistent line that's a breeze to erase, so you can map out your layout without commitment.
- Fine-Liner Pens: Once you’re happy with the pencil sketch, going over it with black fine-liners (like Pigma Microns in 01, 03, and 05 sizes) makes everything look crisp and professional.
- A Clear Ruler: A small, transparent ruler is non-negotiable for getting those perfectly straight walls, windows, and furniture edges.
This is the perfect setup for a homeowner trying to figure out a new furniture arrangement or a real estate agent quickly showing a client the potential of a space.
The Modern Digital Workflow
On the flip side, sketching on a tablet offers a level of flexibility that's hard to beat. The ability to undo mistakes with a tap, play with layers, and instantly duplicate a layout to test different furniture options is a massive time-saver. This is especially true for designers iterating on client feedback or an Airbnb host wanting to try multiple looks for a rental property.
Digital apps have come a long way. A tool like Procreate on an iPad feels incredibly intuitive and gives you access to a universe of colors and textures. If you want to explore more options, our guide to the best free interior design apps is a great place to find software that won't break the bank.
Comparing Traditional and Digital Sketching Tools
| Tool Type | Examples | Pros | Cons |
|---|---|---|---|
| Traditional | Graph paper, mechanical pencils, fine-liner pens, rulers | Low cost, no batteries required, tactile and direct feel | Harder to undo mistakes, limited color/texture options |
| Digital | Tablet (e.g., iPad), stylus (e.g., Apple Pencil), apps (e.g., Procreate) | Infinite undo/redo, easy layering, endless colors/brushes | Higher initial cost, requires charging, can have a learning curve |
Ultimately, there’s no right or wrong answer here. It’s all about personal preference.
The best tool is simply the one you'll actually use. Whether it's a trusty pencil or a sleek tablet, the goal is to remove barriers between your idea and the page, allowing your creativity to flow freely.
No matter which path you choose, your sketch is the foundation. And once you have it, tools like Interior Redesigne AI can take that simple drawing—whether it’s a quick photo of your paper sketch or a saved digital file—and instantly generate photorealistic concepts. It's the perfect way to visualize your ideas before buying a single item.
Understanding Perspective and Scale (Without the Jargon)
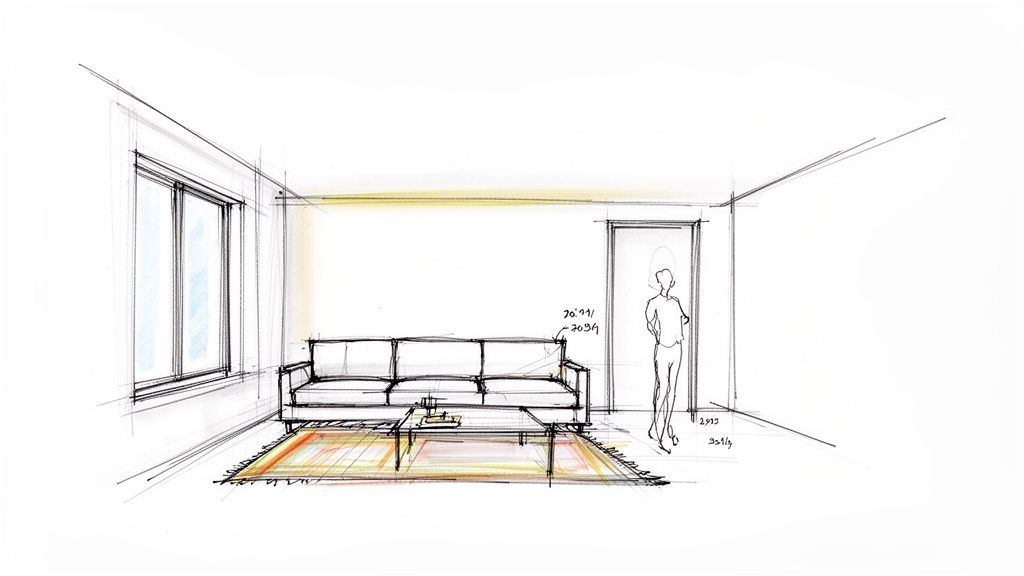
This is where the magic happens. It’s the moment your flat drawing starts to feel like a real, three-dimensional room you could walk into. Getting perspective and scale right in your sketches isn't about being a fine artist; it’s about a few simple rules that stop you from buying that beautiful sofa that completely swallows your living room.
For anyone starting out, the easiest way to create depth is with one-point perspective. Imagine standing at one end of a room and looking straight ahead. The lines that run away from you—like the corners where walls meet the floor—all seem to shrink toward a single point in the distance. That point is your vanishing point, and it’s the secret to faking depth on a flat piece of paper.
The Basics of One-Point Perspective
Let’s get practical. Here’s a step-by-step way to create a realistic room sketch:
- Draw Your Horizon: Start by drawing a light, horizontal line across your page. This is your eye level.
- Add a Vanishing Point: Pick a spot on that line and make a dot—that’s your vanishing point.
- Draw the Back Wall: Draw a rectangle somewhere on the page. This is the wall at the very back of your room.
- Connect the Dots: From each corner of that rectangle, draw faint lines that connect directly to your vanishing point.
Just like that, you've framed out your room! Those angled lines create the illusion of walls, a floor, and a ceiling. Now you can add details:
- Doors and Windows: The sides of doors and windows should be perfectly vertical. The top and bottom edges, however, should follow those angled perspective lines back to the vanishing point.
- Furniture: A sofa placed against the back wall is just a simple rectangle. But if you place it along a side wall, its vertical lines stay straight, while the top and bottom lines will recede toward that vanishing point.
If you want to get more advanced, this guide on perspective change is a fantastic resource.
Making Scale Work for You (and Your Budget)
Scale is just as crucial as perspective. It's what keeps everything in your sketch proportionally correct, which is essential for planning a real space. You don't need fancy architectural rulers; a simple ratio will work perfectly. A common one is 1/2 inch = 1 foot.
Grab a tape measure, get your room’s actual dimensions, and scale them down. If your living room is 12 feet by 15 feet, your drawing on paper would be 6 inches by 7.5 inches. This simple step lets you block out furniture and see how things really fit. A standard sofa is about 7 feet long, which translates to 3.5 inches in your sketch. Suddenly, you can see exactly how much room is left for a coffee table or a clear walkway. This prevents costly buying mistakes!
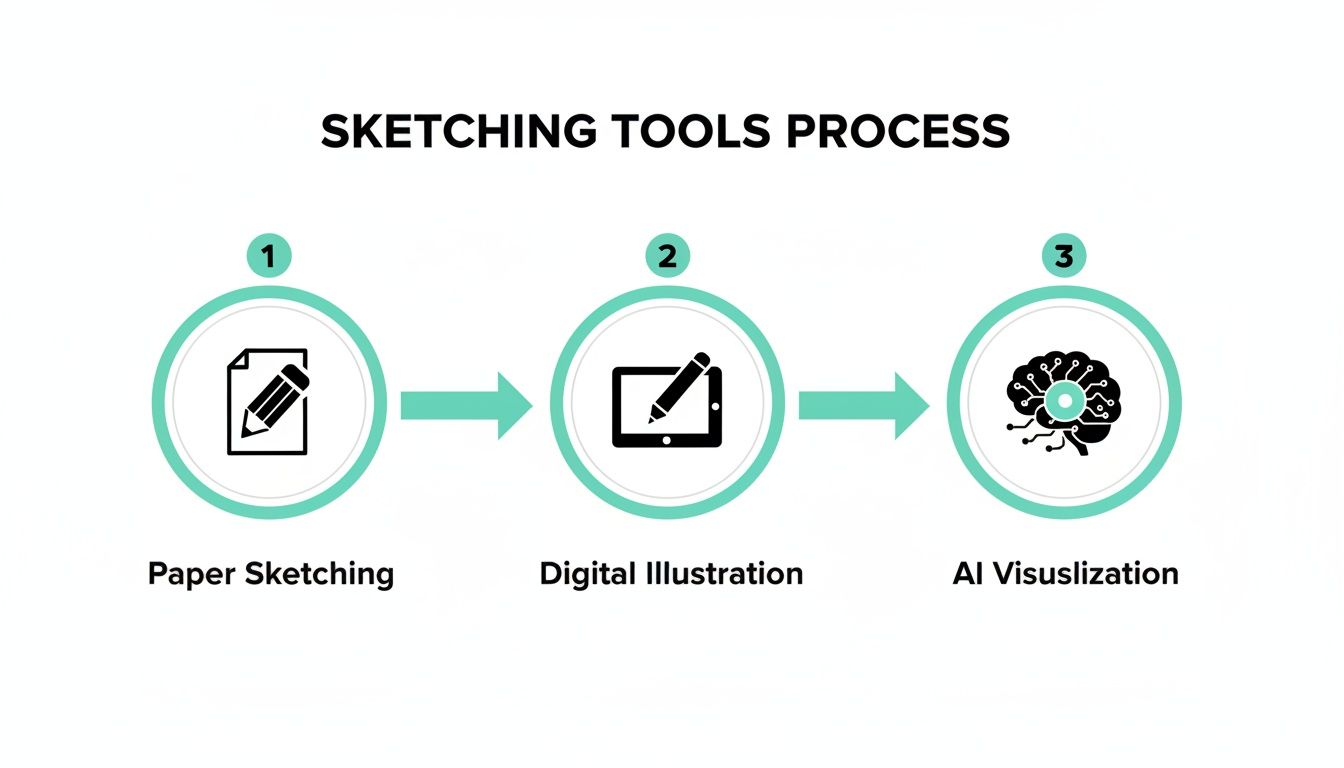
This process shows how a simple hand-drawn sketch is just the first step. From there, you can take it into digital tools and eventually create stunning AI visualizations.
The global interior design market is huge, and designers in North America—which accounts for about 32% of the industry—all start with a sketch to nail down a client's vision. Now you can use the same pro techniques for your own home.
By combining simple perspective with basic scale, your sketch becomes an incredibly accurate tool. It empowers you to make confident decisions, preventing costly mistakes and ensuring the final room is as functional as it is beautiful.
Adding Details That Bring Your Vision to Life
A truly useful sketch does more than just outline a floor plan—it tells the story of the room's future atmosphere. Once you’ve nailed the perspective and scale, it’s time to layer in the details that turn a simple drawing into an actionable blueprint for your bedroom, kitchen, or living room makeover.
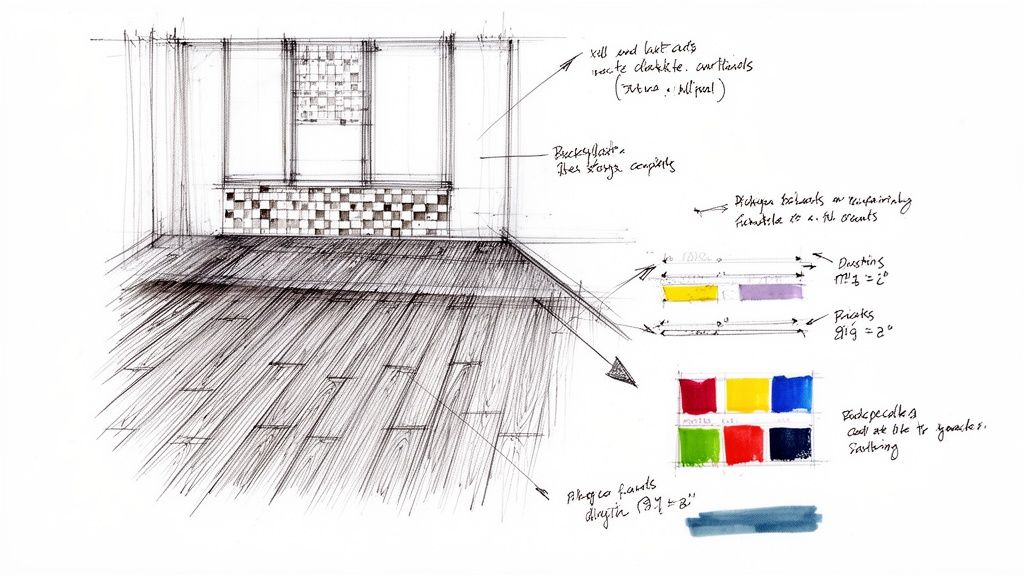
This is where the personality of your design really starts to shine. It’s all about suggesting textures and materials with simple drawing techniques. You don't need to be a professional artist; a few thoughtful marks are all it takes to communicate your ideas clearly.
Indicating Materials and Textures
Simple patterns can do a lot of heavy lifting, visually representing different surfaces and making your sketch instantly more readable. Think of it as shorthand for a partner, contractor, or even just for yourself later on. It’s about suggestion, not perfect illustration.
A few easy techniques for common rooms:
- Living Room Wood Floor: Use parallel, slightly wavy lines to mimic wood grain.
- Kitchen or Bathroom Tile: A simple grid of squares is perfect for showing a kitchen backsplash or bathroom floor.
- Bedroom Upholstery: Light cross-hatching on a sofa or headboard instantly suggests a woven fabric texture.
- Outdoor Patio Rug: Outline the rug’s placement and fill it with stippling (small dots) to set it apart from the floor.
These little details add depth and get you thinking about the material palette early on. For more ideas, exploring interior design mood board examples is a fantastic way to find inspiration for textures and finishes.
Annotating for Absolute Clarity
Annotations—the notes and measurements you add directly onto your sketch—are arguably the most critical details of all. They eliminate guesswork and transform your vision into a practical guide. This step is a lifesaver for avoiding miscommunication and costly errors down the line.
A well-annotated sketch is a contract with reality. It ensures that the beautiful room you've envisioned is the same one that gets built, preventing misunderstandings before they happen.
Start labeling key elements. Clearly mark the dimensions for windows and doors, note the ideal placement for new electrical outlets, and jot down potential paint colors. With sustainability in mind, you can even note the use of eco-friendly materials. As this detailed report shows, specifying green materials is a growing trend.
Once you have these crucial details down, an AI tool like Interior Redesigne AI can take your annotated sketch and instantly generate realistic visualizations. This helps you see exactly how those specified materials and colors will look in your finished space, letting you test ideas before committing.
Bringing Your Sketch to Life with AI
This is where the real fun begins. You’ve put in the work to create a solid plan on paper, and now it's time to see that vision spring to life. Using an AI interior design tool, like Interior Redesigne AI, takes your hand-drawn sketch and almost instantly turns it into a gallery of photorealistic design concepts. It’s the ultimate bridge between your imagination and a tangible result.
If you've ever felt stuck staring at paint chips or endless furniture options, this process is a lifesaver. Instead of trying to imagine how a style might look in your space, you can see it rendered in seconds. This is perfect for making confident decisions for your home, rental property, or real estate listing, ensuring you get it right the first time and save money.
How to Prep Your Sketch for AI
Prepping your sketch for an AI is simple. The goal is to give the technology a clean, clear blueprint to work from. Forget about needing a perfect architectural rendering; a tidy, easy-to-read drawing is all you need.
- Use a Plain Background: A clean sheet of white paper with no grids is best. This lets the AI focus only on your lines.
- Make Your Lines Pop: Once you're happy with your pencil sketch, go over it with a black fine-liner pen. High-contrast lines are much easier for the AI to read.
- Get Good Lighting: Take a photo in a bright, evenly lit room. Watch out for shadows from your hands or phone.
- Get a Straight-On Shot: Hold your phone directly above the paper, parallel to it. Shooting from an angle can warp the perspective.
Once you have your sketch, understanding how to prompt AI to create an image is the next step. This is where you tell the AI what style or mood you're aiming for.
From Upload to "Wow" in Just a Few Clicks
The magic happens the moment you upload your sketch. You simply upload the image, tell the AI what room it is (living room, bedroom, etc.), and start playing with different styles.
Look at this—a simple line drawing was uploaded, a style was selected, and this was the result. The transformation is immediate and incredibly detailed.
As you can see, the AI does more than just color between the lines. It intelligently adds realistic lighting, textures, furniture, and decor to make the space feel real.
This kind of rapid visualization has completely changed the design game. Our guide on using AI for room design has even more tips for getting the most out of your renders.
Playing with Styles and Variations
With your sketch as the foundation, you can experiment endlessly without moving a single piece of furniture. Want to see if Minimalism is for you? Or maybe you’re curious about the cozy vibe of a Farmhouse aesthetic? Now you can test them all in seconds.
- For Homeowners: Try out bold ideas without risk. See how a dark accent wall looks before you paint.
- For Airbnb Hosts: Quickly generate multiple listing photos to see which style gets more attention.
- For Real Estate Agents: Show clients the potential of an empty space by visualizing it fully furnished.
AI visualization empowers you to be your own designer. It removes the guesswork and fear of commitment, allowing you to explore bold ideas and find the perfect style that truly feels like you.
Remember, the AI provides a fantastic starting point, but it's not a replacement for your personal taste. It's a powerful tool to generate ideas. Combine its suggestions with your own style, and if the project is big, consider consulting a professional designer to refine the final plan.
Got Questions About Interior Design Sketching? Let's Clear Them Up.
Jumping into interior design sketching can feel a little intimidating. You're bound to have questions, but they're common ones, and the answers are straightforward. Let's walk through some of the things people often ask.
Remember, the main goal is not to create a masterpiece for a museum. You're creating a practical plan to communicate a vision for your home.
Do I Need to Be an Artist to Sketch My Room?
Absolutely not. This is the biggest myth out there. Your goal with an interior design sketch is clear communication, not fine art. Simple shapes, straight lines, and legible notes are far more important than artistic talent. A good ruler is your best friend here.
Think of it less like a drawing and more like a map of your room. It’s a tool to help you—or a partner or contractor—understand the layout and where everything goes.
What are the Most Common Sketching Mistakes I Should Avoid?
By far, the most common mistake is ignoring scale. People draw a huge sofa that would never fit or a tiny rug that looks lost in the space. This leads to unrealistic plans and buying furniture that just doesn't work—a costly mistake that a few simple measurements can easily prevent.
A few other common slip-ups to watch out for:
- Forgetting Fixed Elements: It's easy to get excited about placing furniture and forget about the radiator under the window, the fixed ceiling light, or the way a door swings open. These architectural details have a massive impact on your layout, especially in apartments or small homes.
- Sticking with Just One Idea: Don't just draw one layout and call it a day! The magic of sketching is that it lets you explore possibilities quickly. Try a few different arrangements to see what genuinely works best for your family or lifestyle.
I Have a Sketch. How Does an AI Tool Actually Help?
Think of an AI tool like Interior Redesigne AI as your personal visualization powerhouse. Your sketch is the blueprint—it sets the layout and placement of important pieces. The AI then takes that blueprint and brings it to life in photorealistic detail.
It takes your simple 2D drawing and instantly generates multiple 3D-style concepts. This lets you see exactly how different materials, colors, and design styles would look in your space. It closes the gap between a basic plan and the finished look, helping you make decisions with confidence and avoid "I wish I'd known" moments.
Can I Just Use a Photo of My Room Instead of Sketching?
Yes, you definitely can, and it's another great way to use AI tools.
A sketch is best when you're starting with a blank slate, like an empty room, or planning a major layout change where you're moving everything around.
A photo is ideal when you want to give an existing, furnished room a makeover. You can just snap a picture of your current living room and see it transformed into dozens of styles, whether you're curious about Japandi (that beautiful mix of Japanese and Scandinavian design) or a cozy Farmhouse vibe.
Ready to see your vision come to life? Take your sketch or room photo and upload it to Interior Redesigne AI to instantly reimagine your room from a photo or sketch. Give it a try at https://www.interiorredesignai.com.