
That messy entryway closet you’ve been ignoring? It has a hidden talent. You can turn a closet into a mudroom by removing the door, adding a bench, and installing smart storage like hooks and cubbies. It’s a project you can tackle in a weekend that will completely change your home's daily rhythm and boost its value.
Why a Closet Mudroom Is Your Home's Next Best Upgrade
If your front door opens into a daily battle with stray shoes, backpacks, and jackets, you're not alone. For many of us, especially in apartments or homes without a dedicated entryway, a real mudroom feels like a luxury we don't have space for. But that underused coat closet? That’s your solution.
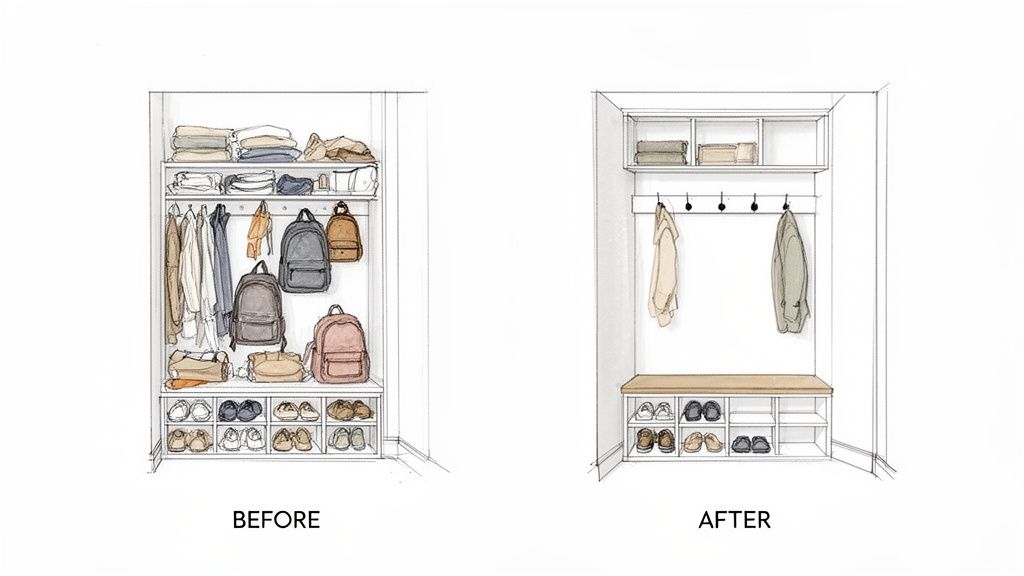
Turning that closet into a functional "mudroom nook" gives all that clutter a designated home. It’s a small renovation with a surprisingly big payoff for your home’s tidiness and your peace of mind. Why does this matter? Because a calm, organized entryway sets the tone for your entire home.
The Real-World Benefits
This isn't just about getting organized; it's a smart home improvement that benefits everyone.
- For families: It means no more frantic searches for a missing glove on a chaotic morning.
- For Airbnb hosts: It's a thoughtful touch that shows guests you’ve considered their comfort, boosting your listing's appeal.
- For real estate agents and sellers: A beautiful, built-in storage solution is a serious draw for buyers. Understanding how to stage a home for selling is crucial, and a dedicated drop-zone makes a property feel more functional and valuable.
This project is less about looks and more about making your home work for you. A closet mudroom directly solves one of the biggest headaches in most households: entryway clutter, saving you time and reducing daily stress.
A Growing Trend in Smart Storage
This idea has taken off for a reason. As our lives get busier, we’re all getting more creative about using the space we already have. The global market for closets and storage was valued at $31.5 billion in 2024 and is still climbing, which shows just how much people want clever, space-saving solutions.
The trend is huge in North America, where many of us are dealing with older homes or layouts not designed for the modern pile-up of stuff by the front door. You can find more data on this growing market over at Woodworking Network.
Visualize Before You Build with AI
One of the biggest hurdles that holds people back is just trying to picture the final result. Will a bench actually fit? What style of hooks will look right? This is where AI interior design tools can be a game-changer, helping you avoid costly mistakes and decision fatigue.
Using a tool like Interior Redesign AI, you can snap a photo of your closet and see different mudroom concepts almost instantly.
- Test different layouts: See if a full bench or individual cubbies makes more sense for your space.
- Experiment with styles: Quickly try everything from modern farmhouse to a clean, minimalist look without buying a single paint sample.
- Finalize your design with confidence: Knowing what you’re aiming for saves you time, money, and stress down the line.
Planning Your Perfect Closet-Turned-Mudroom
Every great project starts with a solid plan. Before you pull off the door or pick out hooks, take a hard look at your space and be honest about what your family actually needs. This is more than just measuring; it’s about observing the daily chaos to design a space that genuinely solves your problems.
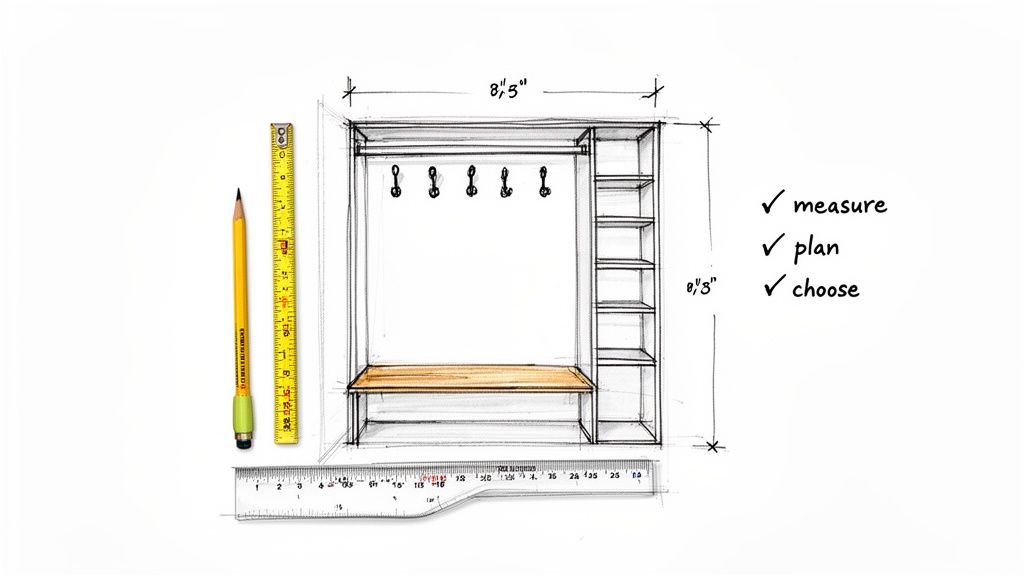
Does your front door currently look like a shoe store exploded? Are backpacks constantly dumped on the kitchen island? Answering these questions first helps you prioritize the features that will make the biggest impact, ensuring your new mudroom nook is more than just a pretty picture.
Pinpoint Your Must-Haves
Think about who will use this space every day and what they need to get out the door. You're not building a generic mudroom; you're creating a command center for your unique life.
- Open vs. Closed Storage: Do you crave the clean look of cabinets to hide clutter, or are open cubbies more practical for grabbing things on the fly? For a nook visible from a main living area, closed storage is often the best choice for a tidy look.
- The Seating Situation: A bench is a mudroom classic. Do you want something built-in for a seamless, custom feel, or would a freestanding bench with shoe storage underneath work better, especially if you're renting?
- Essential Extras: What are your non-negotiables? This could be a hidden spot for a stick vacuum, an integrated charging station for devices, or simply placing hooks low enough for your kids to hang up their own coats.
From a Quick Sketch to a Clear AI Vision
Once you have a rough idea, get it down on paper. You don't need to be an architect—a simple sketch with your closet's measurements is the perfect starting point. This drawing is your first reality check to see if your ideas will actually fit.
This is exactly where AI visualization tools are a game-changer. A simple sketch can feel abstract, making it tough to commit to a paint color or material. Seeing a photorealistic render of your idea changes everything.
Using a tool like Interior Redesign AI, you can upload that sketch or a photo of your closet and see your idea come to life in multiple styles. Instantly compare layouts—maybe a full-length bench against one wall with tall storage on the other. Test out different textures like classic beadboard or modern shiplap. This process removes the expensive guesswork, helping you land on a final design that's both beautiful and functional.
While AI is fantastic for generating ideas, remember its limitations. It can't measure your space or tell you which materials are best for your climate. Always combine AI-generated concepts with your personal taste and practical needs.
Before you start, get your project organized with a complete home renovation checklist.
Designing Your Ideal Mudroom Layout and Style
With planning complete, you can finally get to the fun part: designing a space that’s as good-looking as it is hardworking. When you turn a closet into a mudroom, you’re crafting a custom-fit solution for your family’s chaos. Every choice should solve a real problem, whether that’s finally hiding the mountain of shoes or just making hectic mornings smoother.
A key decision is choosing between built-in and freestanding pieces. Built-ins offer a polished, custom-cabinetry look that maximizes every inch—a fantastic choice if you own your home. However, a stylish freestanding bench paired with a wall-mounted hook rack can be just as effective, plus it’s a lifesaver for renters or anyone on a tight budget.
Finding Your Perfect Storage Mix
The right storage is what makes or breaks a mudroom. It’s easy to fall in love with open cubbies on Pinterest, only to realize you’ve created a permanent display of your family’s clutter. Since your new mudroom is often visible from a main hallway, you’ll likely find that closed storage is the single most important feature for maintaining a tidy appearance.
For a well-rounded design, include a mix of these elements:
- A Sturdy Bench: This is pretty much non-negotiable. It provides a spot to sit and tie shoes and can double as hidden storage with drawers or a lift-top lid.
- Plenty of Hooks: You can never have too many. Use them for coats, backpacks, dog leashes, and bags. I always recommend adding a few at a lower height so kids can be responsible for their own gear.
- Cubbies or Cabinets: Open cubbies work beautifully for decorative baskets holding hats and gloves. Closed cabinets, however, are your secret weapon for hiding the shoe pile and bulky sports equipment.
A truly functional mudroom thinks beyond coats and shoes. Don’t forget to plan for a hidden electrical outlet to create a designated charging station for devices or to tuck away a cordless vacuum.
To help you decide on the core components for your space, here’s a quick comparison of the most common options.
Essential Mudroom Components Compared
This table breaks down common storage and seating options to help you choose the best fit for your space, budget, and daily needs.
| Component | Best For | Average Cost (DIY) | Pros | Cons |
|---|---|---|---|---|
| Built-in Bench | Maximizing small spaces; achieving a custom, high-end look. | $200 - $600 | Seamless integration; highly durable; offers hidden storage potential. | Permanent installation; more complex and costly to build. |
| Freestanding Bench | Renters; budget-conscious projects; those who want flexibility. | $75 - $250 | Movable; affordable; easy to swap out if your style changes. | May not fit perfectly; can look less integrated than built-ins. |
| Wall Hooks | Everyone! Quick access to frequently used items. | $20 - $100 | Inexpensive; easy to install; takes up zero floor space. | Can look cluttered if overloaded; doesn't hide anything. |
| Open Cubbies | Storing items in baskets; designated spots for each family member. | $100 - $400 | Easy access; encourages organization; visually appealing when tidy. | Clutter is always visible; can become a "drop zone" for junk. |
| Closed Cabinets | Hiding shoes, seasonal gear, and general clutter. | $150 - $500 | Conceals mess; creates a clean, streamlined look. | Can be bulky; requires more space for doors to swing open. |
The best setup is often a combination. A built-in bench with drawers below, hooks above, and one tall cabinet to the side is a classic, effective design.
Visualizing Your Style Before You Commit
Now for the really fun part—where it’s easy to get stuck. Are you picturing a rustic farmhouse vibe with shiplap walls, or would a sleek, modern design feel more at home? The options are endless, which can feel overwhelming. It's tough to imagine how different materials and colors will look in your specific closet.
This is the perfect time to bring in technology. Instead of agonizing over paint swatches, you can see your vision come to life instantly with an AI interior design tool.
With a tool like Interior Redesign AI, you can snap a photo of your empty closet and generate dozens of variations in seconds. See exactly how a warm oak bench looks against cool gray paint. Compare the texture of classic beadboard with a simple, painted wall. This process removes the guesswork and helps you avoid expensive design mistakes. You can experiment digitally until you’re completely confident in every choice—from paint to hardware—before spending a dime.
If you need some inspiration, our comprehensive interior design styles guide can help you nail down the exact look you want.
Bringing Your Mudroom Vision to Life: A Step-by-Step Guide
You've planned, you've visualized—now it's time to make it happen. This is where your closet starts its transformation into a functional, beautiful mudroom. Take your time with each step; careful work now pays off with a professional-looking finish that will last for years.
The first move is always to gut the space. Remove the closet door, shelves, rods, and any old hardware. You need a completely clean slate to build from.
Step 1: Prep Work, the Foundation of a Great Finish
With the old hardware gone, you'll likely have a collection of screw holes and dings. Don't skip this part!
- Fill every hole with spackle, let it dry, and sand everything perfectly smooth.
- Wipe down the walls to remove dust.
- Paint now—it's a hundred times easier than trying to cut in around a newly installed bench. A fresh coat of a durable, scuff-resistant paint will immediately make the nook feel intentional and bright.
Step 2: Install the Bones of Your Mudroom
Now for the fun part: building the main features. I always recommend starting with the bench. It's the anchor of the whole design, and everything else builds on top of it.
Whether you're building a floating bench or a base with shoe cubbies, make sure it’s rock-solid by securing it directly to the wall studs. A wobbly bench is a safety hazard.
Once the bench is secure, you can add custom details:
- Wall Treatments: Elevate the look with beadboard or shiplap on the back wall. It's a classic choice that screams "custom build" and is easy to install with construction adhesive and finishing nails.
- Heavy-Duty Hooks: Don't skimp here. You need hooks that can handle a heavy winter coat or a kid's full backpack. For maximum strength, mount them on a solid wood board that you've screwed into the studs.
Think of the build in layers: bench first, then cubbies or side cabinets, then the hook board. This sequence ensures a perfect fit.
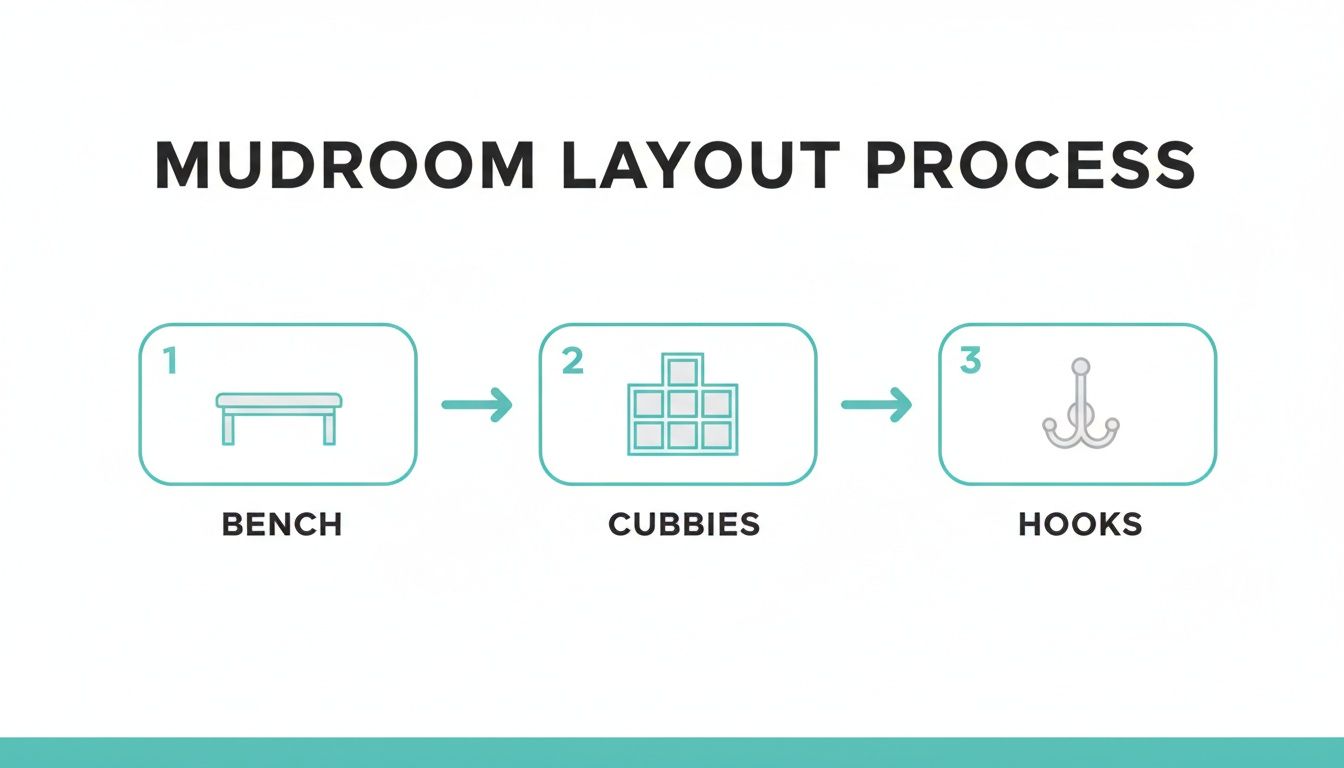
Following this order helps create a stable, cohesive structure where each piece properly supports the next.
Step 3: Add Finishing Touches like Flooring and Lighting
Don't forget to look down! The original closet flooring might be worn or unsuitable for a high-traffic mudroom. A great, affordable upgrade is luxury vinyl tile (LVT). It’s tough, waterproof, and can often be installed right over your existing floor.
Lighting turns a dark closet into a welcoming nook. If you don't have a light fixture, a simple battery-powered, motion-activated LED puck light is a game-changer. It takes minutes to install and provides bright, hands-free light without calling an electrician.
Pro Tip: Before you cut any wood, use painter's tape to outline your bench and storage on the walls and floor. This simple trick lets you see the scale in real life, helping you catch potential design flaws before they become costly mistakes.
If you realize this project isn't the right fit, don't worry. A spare closet has tons of potential. For other creative ideas, check out our guide on how to convert a closet into a bookcase.
Budgeting Your Project and Boosting Home Value
One of the best things about turning a closet into a mudroom is that it’s a high-impact project for almost any budget. Unlike a kitchen gut, you don't need a massive fund to create a space that adds incredible daily convenience and seriously boosts your home’s appeal.
Your final cost really comes down to the scope and materials you choose. A simple, effective mudroom nook can be surprisingly affordable. With smart shopping and a DIY spirit, you could pull off a basic conversion for just a few hundred dollars using a simple bench, hooks, and fresh paint. A more custom approach with built-in cabinetry and drawers will naturally cost more, but it’s still a fraction of a full room addition.
Keeping Costs in Check
Sticking to a budget doesn't mean sacrificing style. A little creativity can go a long way in achieving a high-end look for less.
Here are a few practical ways to save money:
- Upcycle and Repurpose: Before buying anything new, look around your home. An old dresser or a sturdy bookshelf can often be converted into a fantastic bench with built-in storage.
- Shop Smart for Hardware: Knobs, hooks, and pulls can add up. Look for deals at flea markets, antique shops, or end-of-season sales at big-box stores.
- DIY What You Can: If you're comfortable with basic tools, building your own bench or installing wall paneling can save a significant amount on labor costs.
A Smart Investment in Your Home
This project isn't just an organizational win; it's a solid financial investment. Organized, functional storage is a huge selling point for potential buyers and renters. A well-designed mudroom nook shows you’ve thoughtfully maximized every square foot of the home.
In fact, this is one of the most budget-friendly upgrades you can make. Real DIY examples show a simple conversion using wood for a bench and some hooks can cost as little as under $30. One homeowner transformed a laundry closet into a fully functional mudroom for just $302 total—covering everything from wood and paint to baskets and hardware. You can check out more of these budget-friendly projects over at Simple Made Pretty.
To put it in perspective, it’s worth looking into other home renovation projects that add the most value to see how this small upgrade stacks up.
When managing project finances, you might find our list of the best home renovation apps helpful for tracking every dollar. Using a tool like Interior Redesign AI during planning also controls costs by helping you finalize design choices early, avoiding expensive, last-minute changes.
Got Questions? We've Got Answers
Even a well-planned project comes with a few questions. When you’re about to turn a closet into a mudroom, a handful of concerns almost always come up. Let's get those sorted out so you can move forward with confidence.
Probably the biggest question is cost. You’ll be happy to hear this is one of the most budget-friendly renovations you can tackle. On average, repurposing an existing closet runs about $50-$100 per square foot. Compare that to a full-blown addition, which can easily jump to $100-$300 per square foot.
For a typical 64-square-foot closet, you're looking at a total project cost between $3,200 and $6,400. That’s a massive saving compared to the $19,200 or more you might spend on new construction. You can dig deeper into the numbers by checking out the full closet organizers market report.
Can I Convert Any Closet?
Just about any closet near an entry point is a contender, but some are better suited for the job. A classic coat closet is the perfect starting point. Generally, simple reach-in closets are easier to work with than walk-ins because the layout is already open and doesn't require as much demolition.
Location is the deciding factor. Is the closet by the door you use most, whether that's the front door, garage entrance, or back patio? If so, you've found the ideal spot.
What Materials Can Handle the Wear and Tear?
Think tough. This little space is going to be a battlefield of muddy boots, wet jackets, and heavy backpacks. Durability is key.
- Flooring: Go for something that can take a beating and shrug off water. Luxury vinyl tile (LVT) and porcelain tile are fantastic choices. They're both waterproof, scratch-resistant, and easy to clean.
- Walls: You need a finish you can scrub. A semi-gloss or satin paint is your best friend here, as it resists moisture and scuffs. For extra protection that also looks great, consider installing beadboard or shiplap on the lower half of the walls.
- Bench: This needs to be solid. I recommend solid wood, like pine or oak, or a high-quality plywood. Steer clear of particleboard; it won't hold up to daily weight and moisture.
Not sure how that dark wood bench will look with the tile you picked out? This is the perfect time to use an AI visualizer. You can test out different flooring, paint, and material combinations in a virtual version of your closet before you spend a dime.
Should I DIY This or Hire a Pro?
Honestly, it depends on your plan's ambition.
- DIY Project: If you're doing a straightforward conversion—removing the door, painting, and installing a pre-made bench and hooks—most homeowners with basic skills can absolutely handle this.
- Hire a Pro: If you're dreaming of custom built-in cubbies, need to run electrical for new lighting, or want to knock down a wall, it's time to call in the pros. A good carpenter or general contractor will ensure everything is built to last, wired safely, and looks professionally finished.
Ready to stop guessing and start seeing? Upload a photo of your closet to Interior Redesign AI and instantly play with dozens of mudroom designs made for your exact space. Try it now and bring your ideas to life.